How To Root Samsung Galaxy S3 running Jelly Bean

Root Tutorial : Samsung Galaxy S3 is the successor of the Samsung Galaxy S2, developed and marketed by Samsung and running on an Android operating system.

There are so many benefits of rooting your Samsung Galaxy S3 smartphone like as allowing third party apps, tweaks, themes, Android Emulator games and you can also customize or personalize your phone according to your needs. But It will void your warranty, as It rooting will trigger KNOX system. It is highly advisable to first take backup of your entire data and charge that to at least 90%, so that during the time of rooting it won’t switch-off.

root samsung galaxy s3 android

S3 is available with gt-i9300, gt-i9305, gt-i8190, gt 19305 models and It has expanded hardware, additional software features, and a redesigned look from the Galaxy S2. It offers a 4.8 inch touchscreen, intelligent personal assistant (S Voice), wireless charging option, eye-tracking ability, and increased storage. The RAM and the processors vary with countries, and so does the 4G LTE support. This mobile phone was originally launched with the Android 4.0.4 Ice Cream Sandwich and can be updated to Android 4.3 Jelly Bean.

The updated version of Android, is available in the market for the Galaxy S3. After rooting the device, it is advised to flash a custom recovery in order to download and install the new custom ROMs. Some of the widely used custom ROMs used are Paranoid Android, CyanogenMod,Omni, and Carbon. You should not however try to root other Samsung deices or any other devices for that matter using the files discussed in this article.

At first you have to disable the Samsung KIES program in your computer. Then disable the antivirus you are using. Enable the USB Debugging from the Developers Options. The phone’s battery has to be at least 50 % or it will switch off in the middle of the process. Rooting the device may revoke the warrant, and you need to flash an official Samsung Android ROM operating system.

How to root your Galaxy S3 android phone?

To smoothly root your device, just follow the understated steps, and do not skip any, as it may cause unwanted problems.

  • First download the Cf-auto-root zip file, and extract the contents.
  • Download Odin 3.09 and extract this also.
  • Switch off your device.
  • Then boot the device in Android Downloaded mode, but you need to be careful as this may brick your device. If you are a novice watch tutorial videos as how to properly boot a device in Android downloadable mode.
  • Launch Odin 3.09 exe on your PC.
  • Connect your device via USB cable, and let ODIN detect the device.
  • Open the main ODIN window, and click on AP to find the CF-auto-root tar.md5 file. Load the file in ODIN, and do not change any settings.
  • Start the rooting process, once ready.
  • After completion, it will show Pass alert, and the phone will reboot to normal. Unplug the device once the Samsung Galaxy S3 boot animation screen loads.
  • Use Google Account info in order to use your device again. Check Gmail setting before using that.

Congratulation! You have successfully root your Galaxy S3. Now you can Now you have administration rights and you can do anything with your Android operating system. You can edit or modify system settings, architecture and much more.

How to download and use sysprep in windows 7

The System Preparation Tool which is also known as sysprep, is primarily meant for OEMs and System Administrators in Windows.

SysPrep is that tool that is used to automate the setting out of the Windows operating system. After performing the setup on the mother computer, one can do the same on another computer to transfer the image of the mother computer onto the next computer.

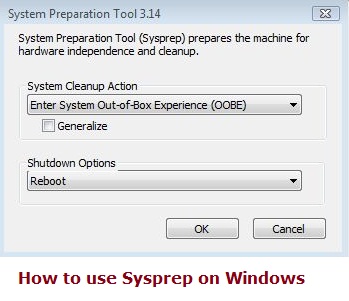
usage and download sysprep on Windows 7

This tool can be found in \Windows\System32\sysprep folder. This tool is not known to many, although being quite easy to download and install. Alone this tool has limited functions, but with an answer file, the limitation are lifted, and a lot of things can be done with this tool. It won’t require any windows 7 iso file.

What is the usage of Sysprep ?

The widest use is to capture the image of a Windows operating system from a computer and then transfer it onto another, while installing the Windows operating system. After doing so, the setup would not ask anything from the user, and would be installed as per the choices of the mother computer’s Operating system. This is called unattended answer file.

How to Download SysPrep for Windows 7?

However some of the users are not comfortable using sysprep, as they are not confident. Here are some steps which will help to run sysprep properly.

  1. To run sysprep, first go to the folder which has the sysprep application. It stated above. Make sure that this computer has been running for an extended period of time, and has been updated with a service pack.
  2. After installing Windows, do not enter any user information, in the personalize page of win 8 or the last step of the installation in win 7.
  3. Reboot to audit mode, by pressing CTRL + SHIFT + F3 when the window for the user name of the computer appears, and after going to the desktop, click cancel on the Sysprep GUI.
  4. Download and install the Windows System Image Manager or simply SIM, so that you can create the answer file. The file could be executable or an ISO file. IF it is an ISO file Burn it or mount it and then execute it. Install the file.
  5. Open SIM and open file menu, then click on new answer file. Then click yes, to open the image of the Windows to be syspreped.
  6. Open the file from where you first executed the sysprep file. Go to sources and then click on install.wim and click OK. Then click on the edition of the Windows you just installed.
  7. Then modify Windows as you deem suitable.

Although one can download the sysprep from the internet, Microsoft has incorporated this function along with the operating systems since Microsoft Windows Vista. As stated above one can find the sysprep in \Windows\System32\sysprep folder. So there is no need to download and install sysprep on a machine that has windows 7 or 8 pcs.

Microsoft doesn’t support some of the scenario of Syspreps and which you have to take care. Please check KB180962 to get more information on how to easily identify installation of Windows on your PC using System Preparation Tool.

How to Manage Your Time Effectively in College?

Time management is the capability of a person to plan and control his or her day’s activities in order to achieve set aims and targets. Effective time management is a challenge for almost every college student.

According to recent studies, poor time management is one of the root causes of examination failure and set-backs. Most students fail woefully in school not because of their intellectual capability but because they fail to manage their time well. Therefore, drawing a line between fun and study should be an important priority for every college student and in this article, I will provide some important tips you can apply as a college student to effectively manage your time.

If you’re writing a paper now I also advise you to check dissertation writers for hire who could cheer you up with a help to write a dissertation.

  • Set targets

It is almost impossible to achieve academic excellence without appropriate target setting. For instance, a student that graduated top of his or her class in school actually planned it well by scoring consistent A’s in all the required courses. Hence, to maximize your time in school, set targets for yourself and work hard towards it. You can even write it on a sheet and paste it on your wardrobe door because reading it every day will motivate you to cut-off all possible distractions that wastes your time.


  • Do one task at a time

Although multitasking is a very common attribute possessed by most college students, doing so many things at the same time will lead to less productivity and an abrupt waste of time. Instead of doing all of the tasks without achieving much, divide them and sort them out, one at a time. For instance, if you are given an arithmetic assignment to complete coupled with an essay to write, do the arithmetic yourself and buy essay online from a reliable writing agency. This way, you will get the two tasks done within a shorter period of time.


  • Be clever during break

When studying, experts suggest that taking a regular break of 15 to 20 minutes after a reading session improves one’s retentive capabilities. However, to avoid wasting time during breaks, apply wisdom by avoiding things that will consume more time like the internet or maybe a movie. Rather, doing something like phoning a friend or reading a chapter of a short book is highly advisable.


  • Ask for help

One of the biggest challenges most college students that go to school from their homes tend to face when studying is chore-completion. While some parents may understand and allow you focus, you may be unfortunate to have parents that can send you on an errand that absorbs all your reading time. However, if you are unfortunate to stay in such homes, you can ask your sibling to assist you with the chores. On the other hand if no alternative is available, complete the chores on time and focus on your studies.


  • Use a to-do list

Planning your day in the morning is a great way to manage your time. To-do list is a schedule that summarizes the tasks you are expected to complete in the day. However, when drafting one, give priority to important tasks and delegate enough time to your studies. However, identifying the things to be done on time will help you draft out an effective to-do list.


  • Develop a routine that works for you

You can spend lots of hours studying without actually gaining anything due to one or two distractions. Hence, to overcome these distractions that can waste your time, develop a routine that works for you and do not just draft a to-do list without considering some external factors. For instance, if you live in a home that houses many people, it can be almost impossible to avoid noise while studying. Hence, you can draw a reading routine for the early hours of morning to study well within a short time.


  • Start with the easy tasks

Task management is one of the keys that determine whether you will manage your time well or not. However, to accomplish lots of tasks, start with the small tasks. Procrastination normally creeps in when difficult tasks are set out for accomplishment and starting out and completing the smaller tasks under a short time will motivate you to try the difficult ones.


  • Use technology

In recent years, software has been developed to help us effectively manage our time. Some of them assist us to create and manage lists, improve results, set targets and goals. Hence, as a college student to effectively manage your time, employ these apps regularly. Toggl, Freedom and RescueTime are examples of these apps.

In summary, managing your time well as a student is largely dependent on you and this article contains some tips that can help you manage your time effectively in college. Nevertheless, going to class regularly, keeping a study log, completing your assignment on time and focusing with utmost care will also help you manage your time effectively.

How to remove and disable Windows 7 startup programs

There are many programs that are installed in your PC, which are configured to load themselves after startup. So these programs start automatically after switching on your PC even if you do not want them to.

You can see these programs in the notifications, once they are started. If the number of startup programs increase, then the performance of the machine is decreased, and so it is better to disable and remove the startup programs that are not required. This helps to clear the RAM and the speed of the computer automatically increases.

remove and disable windows 7 start-up programs

Disabling start up programs can be quite simple, if you know the correct procedure, but for those of you who do not know, just follow the steps that are stated underneath, and you will be able to remove and manage your startup programs without any problems.

How to Disable or Remove  Startup programs in Windows 7?

If you are Windows user and want to handle your program that launch during the starting of windows then you should follow the easy steps given here.

  • Go to the control panel, and click on “System and Security”, and then click on the “Administrative Tools” option.
  • In the “Administrative Tools” click on “System Configuration”. You can also open this by typing “msconfid.exe” in the search box of the start menu.
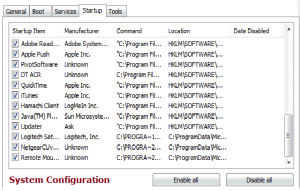
  • Once the System Configuration applet is opened, click on the Startup option.
  • In the tab, you will see the list of all the existing programs which are configured as startup programs. Choose and uncheck the programs that you do not want to run on startup from among the list, and the programs will be disabled after rebooting the machine. If you do not require any of the stated programs in the tab, then just click on the “Disable all” button, which will disable all the programs, and none of them will run on start-up after rebooting the machine.
  • After unchecking the programs, click on the “Apply” button, and you will notice that the date on which you disabled the particular program will appear beside that program. The date will be shown under the “Date Disabled” column.
  • After you click on the “OK” button, a dialogue box will appear which will state that the programs will not be disabled until you restart the PC, and two options will be shown “Restart” and “Exit without restart”. Click on restart to reboot the machine, otherwise click on the other button to continue your work without restarting your PC.
  • After rebooting, all the selected programs will be disabled at startup.
  • You can also manage and enable various other programs on start-up by going to the same tab as before.

Many time  you may see some unusual programs in your Windows task bar. That is due to software you installed, usually some software automatically put their file under start up folder and you may see them on task bar. Once you follow steps given above you may easily manage your start-up program by removing or adding your choice of programs over there.

How to recover deleted files on windows 7 and 8 PC

When you simply press the delete button while selecting one or many files, it simply transfers them to the recycle bin, and restoring them is quite easy. However if you happen to select one or many files and the press Shift + Delete, then the computer permanently deletes that or those files. This can be quite a problem if you have mistakenly deleted some of your files in this manner, as you cannot just restore them, unlike from the recycle bin. So you need to know how to recover deleted files, when you have deleted them using Shift + Delete.

When you delete files using Shift + Del, the files are not immediately deleted. Windows marks the hard drive space that was being used as being available. It does this by changing a character in the file table. If you can start an undelete process before Windows home premium overwrites that space or part of the hard drive, you can recover your deleted file. You can use recovery software that are available on the net to do the trick. But the hard drive has to remain unchanged before the recovery is complete.

Software to recover deleted files on Windows 8 and 7

One such software is “Pandora Recovery”. This software helps to recover software deleted from the “Recycling Bin”, files deleted using Shift + Del, and files deleted using the DOS Prompt. This software also helps to recover as well as find recoverable deleted objects and files from NTFS-formatted drives and volumes, without considering their types. Recovering pictures, songs, movies and documents will be quite easy while using this software. The setup file is about 2.12 MB.

recover deleted files in windows 7 & 8 pcs

Another recovery software is Tokiwa Data Recovery. This software is easy to download and install. This software will help you to recover accidentally deleted folders and files from the hard drive and the recycle bin. It can not only recover files from NTFS-formatted drives, but also from FAT12, FAT32, and FAT16. It can also recover EPS encrypted files and NTFS compressed files.

Undelete Plus” is another software used to restore deleted files in an easy and efficient way. It recovers files deleted using Shift + Del, files deleted from the Recycle Bin, and files deleted using Command Prompt. This software works smoothly on Windows 7 and 8 PCs, and can restore files deleted from various formats of storage drives such as FAT12, FAT16, FAT32, NTFS, NTFS5 and recovers images from Compact Flash, Multi Media, Smart Media, and Secure Digital cards. The setup file is requires a meager 583 KB of space, and this software needs to be installed before executing.

Tip for Editor : It is better to take some precaution to avoid such situation. Instead of deleting files with Shift + Del command you should adopt practice to use standard delete keys to delete any files, and at every month check your recycle bin and remove unnecessary files from there.

In case you don’t able to recover deleted files on Windows PC you can contact us by commenting here. I will try to help you by providing satisfactory solution.

Nomorerack real Reviews, Is it legit or scam?

Nomorerack.com, pronounced as No More Rack is the emerging daily limited edition deal website running for people of US and Canada.

NoMoreRack features unbeatable deals that go live every day at 12 PM EST timing. Customer can get upto 90% discount on various products like Electronics, Jewelry, Home decor, toys, auto gears, footwear, lifestyle items and many other accessories for men, women and kids.

nomorerack legit reviews

If you are newbies to NoMoreRack.com and want to know real review then you have landed on correct page. I have been purchasing from them since last one years. I placed total of 5 orders from them. Three for my home and two for giveaways that I hosted here in my blog. My experience is pretty good with them.  Here in this post, I will provide you all the pros and cons, so that you can buy confidently.

Nomorerack Reviews, Is is scam or true?

It was started 3 years back and emerged as leading daily deal site within a year. They gives 50% to 90% saving on accessories. They features amazing authentic designer merchandise, cool items and other unique products for short term daily deals.

If you are wondering them as scam then you should change your mindset, It may possible that people faced some bad experience but that doesn’t mean that whole website is crappy and scam. I have personally order Five different products (i.e Bed sheet, Kids music player, Bluetooth Speaker, Stylus pens set and headphone ).  All of them were real and quality products.

Things you know when buy from No More Rack :

They offer products from thousands of brands, so before placing your order investigate little bit about the brand that you’re willing to buy.

Many time you see same type of product at different prices. I just found three different Flat Iron. At that time you have to take a call from which brand you want to buy. In my case, Flat Iron was of Instyler, Nova and Phillips, I select Instyler as discount was 60% and feature was far better than other.

Read the title and description of product carefully, especially In electronics product. Many time you see that iPhone and Samsung Galaxy Tab are selling under $100, That all are mostly refurbished with company certificate. If you want to new only product you should eliminate this kind of products.

When you buy clothing, i.e Bra, Swimsuit, Tops, Skirts, Tanks etc. Please select the correct size, otherwise you would be ended up uncomfortable with them. In such cases please check their size chart if you don’t remember your size.

Nomorerack Benefits and Features :-

  • They guarantee 100% authenticity of every products the sell. So you no need to worry about quality of their products.
  • Provides 3-In-One buy safe guarantee. ID Theft Protection, Purchase Guarantee and Lowest price guarantee.
  • Their site is verified by “Authorize.net” and tested by McAfee, so you can buy securely from them.
  • Payment includes PayPal, Master, Visa, Discovery and American Express debit and credit cards.
  • They daily add new events for lifestyle, home furnishing, outdoor, kids and electronics items. Each of their events are unique and valid till supply last.
  • They usually comes with unique products at lowest possible price. I recently found “Cordless Metal, Wood and Glass Engraver with tips” for just $8, In market you may see that with price of $20.

I usually check NoMoreRack.com when I want to buy something, as they mostly have all kind of products that fits your requirement at all at unbeatable price. Below are some of my favorite items that are listed over there.

Beats by Dr. Dre On-Ear Headphones with Built-In Mic – Deal Price $99, Original Price $199.95, So total saving 50%.

Samsung Galaxy S III, Unlocked Smartphone at $293. Original price $699.

6-Piece Set : UltraSoft Bed Sheets for $29 only. Upto 80% Saving!

6 pack of Garcinia Cambogia 60 capsules each for $25 only. Retail price is $175.99, Almost 86% saving ( Must buy for natural Weight loss!).

Dawgs Women Cozy Boots for $15 only. Reg price $79.99!

2-Peice Set” ASUS vivotab Windows 8 RT & Kevboard Dock for $249 with 64% saving!

Mark Ciel Bouclier Satchel for $39. Reg price is $280.

Apart from my Nomorerack real review, one good thing about them is that they run referral program. Give $10 and Get $10. On successful referral of your friend you will get $10 store credit and at the same time your friend will get $10 off on their first purchase.

Good things about NoMorerack is that Shipping is too low that anyone can afford. It’s only $2 and flat regardless of your order size. Many time you may get your order by a week or so but it’s still good for such low shipping price.  Please check their site for more details about return and exchange policy.

So, concluding my review post and giving my final words here. Nomorerack is legit, It’s is not scam site that simply fetch your money and send you something different. You can see that they have around 3 million Facebook fans and that’s not possible for any scam site. So confidently buy from them.

You can also post your No more rack reviews, experience and opinion about them by commenting here.

Guide for Brighthouse Speed Test using SpeedTest.net

Speedtest.net is preferred tool to test internet speed of Brighthouse Networks for your mobile device.

The Brighthouse Networks is a top provider of online TV programs, high speed internet, home phone, and home security services. Their network will connect you to the rest of the world and will let you do things that you enjoy best. These days, the internet is no longer all about your immediate circle of family, friends, and peers. It’s all about reaching out globally.

When using the Bright House Network for anything, it is very important that you maintain a high speed connection. That will make your viewing experience hassle-free, while allowing you to maximize the use of the other services provided by the network.

brighthouse speed test using speedtest.net

While the BrightHouse has an online speed checker that your computer can use, it can’t be utilized by mobile devices. To test whether your iPhone or iPad is suitable with Bright House, what you may use instead is a speed checker called Speedtest.net

What is Speedtest.net ?

It is a mobile speed test checker created by Ookla. It can be downloaded via iTunes and may easily be installed on iOS devices. It is a universal iOS application that can also be used on an iPod Touch. Its newest feature is the landscape mode and a speedometer that dynamically adjusts to facilitate high speed connection. With this app, you can easily choose a server that will provide you with the best possible speed at the time that you connect.

Tips for Brighthouse Speed Test using SpeedTest.net :-

Below is a guide on how you can use SpeedTest.net when testing it for use with the Bright House Network.

  1. Download the app on your mobile device
  2. Run the software to determine your current download and upload speed.
  3. Test for speed all the servers available on the list. That way, you will be able to determine which one will provide you with the fastest connection.
  4. Check your settings and adjust them as necessary.
  5. Pick the best server and configure your device to use it every time it connects to the Bright House Networks.

Speedtest.net is a simple yet effective app to test network path connectivity. It provides accurate network metrics such as download, upload, and ping speed. While it may not provide further services like a network performance test, it is still very useful when checking available servers for speed.

The latest version of Speedtest.net is 3.2.0. It is a highly downloaded speed checker tool today because it offers one-tap connection testing with results delivered in less than 30 seconds. And it will work on almost all networks, including hotspots and public Wi-Fi zones of At&T.

You should check out other related post :

After download and at the time of using above tool If you face any difficulty you can contact us. Please be specific with the problem you are getting, so that we can address that correctly without any delay. Also share this informative tutorial with your friends on Facebook, Twitter and other social sites.

GetSpool features iOS Jailbreak, Cydia Apps, Theme Reviews, Tweaks, iPhone, iPad, Apple TV and iPod news.