There are many programs that are installed in your PC, which are configured to load themselves after startup. So these programs start automatically after switching on your PC even if you do not want them to.
You can see these programs in the notifications, once they are started. If the number of startup programs increase, then the performance of the machine is decreased, and so it is better to disable and remove the startup programs that are not required. This helps to clear the RAM and the speed of the computer automatically increases.
Disabling start up programs can be quite simple, if you know the correct procedure, but for those of you who do not know, just follow the steps that are stated underneath, and you will be able to remove and manage your startup programs without any problems.
- Related : Recover deleted files in Windows
- Check : WhatsApp Free for BlackBerry
- For iSO see : Windows 7 Home Premium iSO Download
How to Disable or Remove Startup programs in Windows 7?
If you are Windows user and want to handle your program that launch during the starting of windows then you should follow the easy steps given here.
- Go to the control panel, and click on “System and Security”, and then click on the “Administrative Tools” option.
- In the “Administrative Tools” click on “System Configuration”. You can also open this by typing “msconfid.exe” in the search box of the start menu.
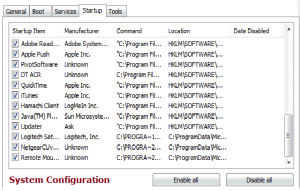
- Once the System Configuration applet is opened, click on the Startup option.
- In the tab, you will see the list of all the existing programs which are configured as startup programs. Choose and uncheck the programs that you do not want to run on startup from among the list, and the programs will be disabled after rebooting the machine. If you do not require any of the stated programs in the tab, then just click on the “Disable all” button, which will disable all the programs, and none of them will run on start-up after rebooting the machine.
- After unchecking the programs, click on the “Apply” button, and you will notice that the date on which you disabled the particular program will appear beside that program. The date will be shown under the “Date Disabled” column.
- After you click on the “OK” button, a dialogue box will appear which will state that the programs will not be disabled until you restart the PC, and two options will be shown “Restart” and “Exit without restart”. Click on restart to reboot the machine, otherwise click on the other button to continue your work without restarting your PC.
- After rebooting, all the selected programs will be disabled at startup.
- You can also manage and enable various other programs on start-up by going to the same tab as before.
Many time you may see some unusual programs in your Windows task bar. That is due to software you installed, usually some software automatically put their file under start up folder and you may see them on task bar. Once you follow steps given above you may easily manage your start-up program by removing or adding your choice of programs over there.


Thsnks for this kind info. I have an issue my computer dell is locked and repeaters that I must enter the code license number of the geniun win 7 home software keeps looping back to same. Will not allow me to exit. Any clues. Thanks