The System Preparation Tool which is also known as sysprep, is primarily meant for OEMs and System Administrators in Windows.
SysPrep is that tool that is used to automate the setting out of the Windows operating system. After performing the setup on the mother computer, one can do the same on another computer to transfer the image of the mother computer onto the next computer.
This tool can be found in \Windows\System32\sysprep folder. This tool is not known to many, although being quite easy to download and install. Alone this tool has limited functions, but with an answer file, the limitation are lifted, and a lot of things can be done with this tool. It won’t require any windows 7 iso file.
What is the usage of Sysprep ?
The widest use is to capture the image of a Windows operating system from a computer and then transfer it onto another, while installing the Windows operating system. After doing so, the setup would not ask anything from the user, and would be installed as per the choices of the mother computer’s Operating system. This is called unattended answer file.
How to Download SysPrep for Windows 7?
However some of the users are not comfortable using sysprep, as they are not confident. Here are some steps which will help to run sysprep properly.
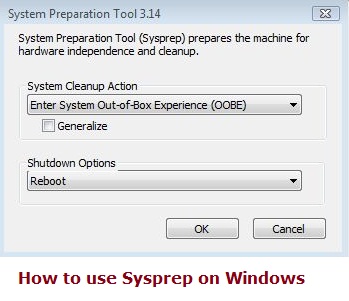
- To run sysprep, first go to the folder which has the sysprep application. It stated above. Make sure that this computer has been running for an extended period of time, and has been updated with a service pack.
- After installing Windows, do not enter any user information, in the personalize page of win 8 or the last step of the installation in win 7.
- Reboot to audit mode, by pressing CTRL + SHIFT + F3 when the window for the user name of the computer appears, and after going to the desktop, click cancel on the Sysprep GUI.
- Download and install the Windows System Image Manager or simply SIM, so that you can create the answer file. The file could be executable or an ISO file. IF it is an ISO file Burn it or mount it and then execute it. Install the file.
- Open SIM and open file menu, then click on new answer file. Then click yes, to open the image of the Windows to be syspreped.
- Open the file from where you first executed the sysprep file. Go to sources and then click on install.wim and click OK. Then click on the edition of the Windows you just installed.
- Then modify Windows as you deem suitable.
Although one can download the sysprep from the internet, Microsoft has incorporated this function along with the operating systems since Microsoft Windows Vista. As stated above one can find the sysprep in \Windows\System32\sysprep folder. So there is no need to download and install sysprep on a machine that has windows 7 or 8 pcs.
Microsoft doesn’t support some of the scenario of Syspreps and which you have to take care. Please check KB180962 to get more information on how to easily identify installation of Windows on your PC using System Preparation Tool.